Sue Wilson at Particraft has a blog candy opportunity going on... she will be drawing at random from her followers when she reaches 1900 - and she is up to 1873 already!
There are five sets of A5Stamp sets for you. A set of Tim Holtz Grunge board pieces, a fun mask to play with, a rub it scrub it pad, a large acrylic block, black archival ink pad, a couple of jars of Cosmic Shimmer embossing powder, color spray wash, a perfect medium pad, Cosmic Shimmer spray mist, a pack of natural wood buttons, a Tim Holtz Distress Ink, decorative stick pins and an Adirondack ink pad.
So what are you waiting for? Get yourself over there and follow Sue's blog!
Xmas 2015

Monday, 24 October 2011
Wednesday, 19 October 2011
Autumnal birthday card

Having seen it, another friend said it was a bit tactless - like now she was fifty she was in the autumn of her life. Hopefully she didn't see it that way - it wasn't intended!
The image was stamped onto plain card (the stamp is one of flower softs) and was then coloured with promarkers. It was simply mat and layered onto a card which already had foiling around the edge.
The sentiment was printed out and mat and layered on gold card.
I would like to enter this card into the challenge at
Oldie but Goodie this week - Forever Autumn
Deep Ocean Challenge blog - Fall colours
Tuesday, 18 October 2011
Snowmen

I am not very good at producing masses of the same card, so I try to ring the changes. That's why I love stamping so much - you can change things dramatically with just a touch of colour.
This card is a monochrome one - White base, white mat (embossed with the swiss dots cuttlebug folder, which I think is perfect for snowy winter cards) and layered onto silver grey card.
I coloured the snowmen in with grey promarkers and added some diecut snowflakes that I covered with quickie glue pen ink and then gilded with gilding flakes.
The sentiment was stamped onto the same silver grey card as the base layer.
I would like to enter this card into the following challenges:
Stampendous impressions - clean and simple
Secret Crafter Saturday challenge - white plus one colour
Ooh la la creations - let it snow
Monday, 17 October 2011
Daylight lamp.
Jak Heath has some blog candy on her blog - a daylight lamp. These are absolutely an essential for colouring in if you want to get the shading right. The lamp that Jak has on offer looks especially useful as it is battery operated, so you can use it where you don't have access to mains power!
A get well wish

I have used card from my stash, and as she is a dog lover, chose a stamp that I believe was from a freebie set given away with a magazine. (I am going to try to label my stamps so I can be more accurate, but I already have so many unknown!)
The decorative shapes are both nestabilities ( the base one is Label one, but the other oval shape I'm not sure of the name).
The swirls are a cuttlebug die, and the butterfly was stamped on acetate and highlighted with glitter. The small bow came from the ribbons supplied with Nikky Hall's Christmas polkadoodles kit (available from Hobbycraft, and WH Smiths, as well as from the Polkadoodles website).
I would like to enter this card into the following challenges:
Polkadoodles week 41 challenge - ribbons and bows.
Crafty Cardmakers Challenge 54 Cute With A Dark Twist

Today's challenge at Crafty Cardmakers - Cute with a Dark twist. This one is sponsored by the wonderful Joanna Sheen and she is offering a £10 voucher, so why not head over and join in? You never know, you may win and can indulge in some shopping at Joanna's great site - p and p is free!
I'm not usually keen on Halloween, but I have a friend whose birthday is on 31st October, so I usually send her a "witchy" card each year. This year's card was made on black base cardstock and is using a background from Serif craft artist (it was one of their kits) which I overlaid with a paper lace strip.
The small girl dressing up was a clear stamp (origin not known, but it may have been a freebie with a magazine) and I coloured her with Spectrum Noir pens. I'm not totally happy with the outcome - I think after all that I do prefer my promarkers!!
The Happy Birthday sentiment was stamped with versamark and embossed with silver, and the three small black gems came from my stash.
Thursday, 13 October 2011
Christmas bear

I used distress inks to colour the hills, using my cut and dry foam to apply the ink. I've forgotten which company made the bear stamp (I really need to make sure things are labelled and stored correctly) but it was coloured using the distress ink to provide shadow and promarkers for the blue bands, then topped with glossy accent. The icy touches (and snow) were done with a quickie glue pen and some clear glamour dust.
I would like to enter this card into the Bear challenge (week 124) at Allsorts challenge
Saturday, 8 October 2011
New baby card

The card was a gatefold square card, with a raised centre flap. I kept the colours plain and simple, using blue and white as the main theme. The butterflies were punched (X cut punch, I believe), as was the dotted edge to the card gatefolds (EK Success edger punch).

Underneath the flap was the normal congratulatory sentiment, and a single "congratulations" was placed under the image. Side panels were made from the same blue card as the topper and front panel butterflies.
I used peel off lettering for the baby's name.

I am entering this card into challenges at
ABC-Challenge - anything goes
Paper crafting Journey - punches or diecuts
Penny's paper-crafty challenge - anything goes
Wednesday, 5 October 2011
Crafty Cardmakers Challenge 53 - Anything goes
The challenge this week from Crafty Cardmakers is "Anything Goes". Well, what an opportunity!!! No thinking needed ... so I thought I would share this one.

I just got a new crackle stamp and tried it out with a walnut stain distress ink. The pictures came from my stash and were simply mat and layered with gold mirri board.
The paper flowers were made with punches, the lace strip was a self adhesive paper lace on a roll that was from Kars. I really like this - it comes in a creamy colour, but if you distress it a bit with the same inkpad as the background it tones really well.
The sentiment was a piece of scrap card cut with a nestie.
Monday, 3 October 2011
How exciting!!!
Well, I have been lucky enough to have been picked to be on the Crafty Cardmakers DT!
I am both excited and nervous about this new responsibility, but I am looking forward to it and will definitely be doing my best. Watch this space!!
I am both excited and nervous about this new responsibility, but I am looking forward to it and will definitely be doing my best. Watch this space!!
Totally Gorjuss Challenge 100 - a sketch
Totally Gorjuss have just issued their 100th challenge, which was a sketch and I thought I would have a go at it.
 Now, Sketches sometimes bamboozle me a bit, because I get obsessed about matching it exactly, but this time it seemed to go ok. The colours are a bit brighter than I usually favour - I'm so not a pink girl! - and I used paper and images given free in Making Cards magazine, along with a couple of extras from my stash. The paper flower and gems are also from my stash.


Sunday, 2 October 2011
Crafty Cardmarkers Design Team Call
Crafty Cardmakers are having a change of Design Team, and I have been pondering whether to apply. The deadline is 2nd October, so I am really leaving it up to the last minute to enter!. Having said that, nothing ventured, nothing gained.
It will be interesting to take on new challenges and perhaps develop my crafting if I am lucky enough to be picked.
We were asked to highlight three projects that showed off our style. My style actually varies with my mood, but rarely (unless we are talking butterflies or flowers) includes lots of embellishments. I'm currently into stamping and colouring, and using images from the various CDs I have bought.
I like to personalise my cards so they fit the person they are being sent to, and I do like to make cards that double up as something else. Ideally, they also work as a gift. So, without further ado, here are my three choices that showcase what I like to do.
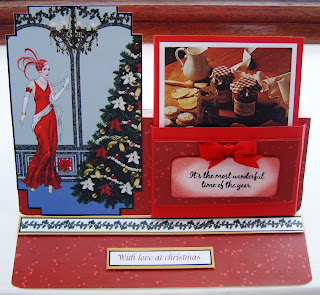
My first choice is an easel card that has a box for recipe cards. As this one was a Christmas Card, I included four specific recipes - Christmas mulled wine, Orange pastry, Traditional Mincemeat, and Mince Pies.
The Art Deco image was from a Debbie Moore CD and the recipes were from a Josceline Dimbleby book I've owned (and loved) for many years.
 My second choice is a really versatile card - you can use it for all occasions. Inspiration for it came from a very talented crafter called Marianne.
I have made one for a new baby, where the gift inside was a pair of baby socks, I have also made one for a wedding, and in that case the gift inside was a horseshoe with confetti.
This photograph is one that was a more general birthday card, and contains tealights.
The front decoration was created using some background paper from my stash. The butterflies were stamped and embossed onto the same paper and then cut out and sprayed with crafters companion spray and sparkle. I made the roses using promarkered paper and punches - I love making my own flowers - and they were then glazed.


Finally, the last item was a challenge - a card with the theme "New Beginnings". I have some new baby cards I could use, but as I have just made a card for someone who has just left their job, I thought that was very appropriate too.
 Nothing like changing jobs to make you feel life is starting over... so yes, New Beginnings.
I've never been part of a design team before, and honestly, have no expectations for this application - there are so many very talented crafters out there and I have no delusions about my own abilities! But as stated before, nothing ventured - nothing gained, and you never know, I may just be picked!! And if I am, I will do my very best.
It will be interesting to take on new challenges and perhaps develop my crafting if I am lucky enough to be picked.
We were asked to highlight three projects that showed off our style. My style actually varies with my mood, but rarely (unless we are talking butterflies or flowers) includes lots of embellishments. I'm currently into stamping and colouring, and using images from the various CDs I have bought.
I like to personalise my cards so they fit the person they are being sent to, and I do like to make cards that double up as something else. Ideally, they also work as a gift. So, without further ado, here are my three choices that showcase what I like to do.
My first choice is an easel card that has a box for recipe cards. As this one was a Christmas Card, I included four specific recipes - Christmas mulled wine, Orange pastry, Traditional Mincemeat, and Mince Pies.
The Art Deco image was from a Debbie Moore CD and the recipes were from a Josceline Dimbleby book I've owned (and loved) for many years.

I have made one for a new baby, where the gift inside was a pair of baby socks, I have also made one for a wedding, and in that case the gift inside was a horseshoe with confetti.
This photograph is one that was a more general birthday card, and contains tealights.
The front decoration was created using some background paper from my stash. The butterflies were stamped and embossed onto the same paper and then cut out and sprayed with crafters companion spray and sparkle. I made the roses using promarkered paper and punches - I love making my own flowers - and they were then glazed.
 .
.

My third choice is to show a more straightforward style of card, and is a birthday card. The main topper was in fact the sentiment and the interest really came from the patterned background paper and the paper flowers. There were very few fiddly bits on this card - simple matting and layering, only. I often make cards where the sentiment you would normally expect to find inside appears on the front as a focal point. I love my nesties for their versatility in doing this.

Finally, the last item was a challenge - a card with the theme "New Beginnings". I have some new baby cards I could use, but as I have just made a card for someone who has just left their job, I thought that was very appropriate too.

I've never been part of a design team before, and honestly, have no expectations for this application - there are so many very talented crafters out there and I have no delusions about my own abilities! But as stated before, nothing ventured - nothing gained, and you never know, I may just be picked!! And if I am, I will do my very best.
Saturday, 1 October 2011
New Beginnings - a Leaving card

This card was an A5 landscape card, with some grey stripey paper from my stash, layered onto a gunmetal silver card. The inverted corner punch gives a great effect with the backing paper - my new favourite thing!
The base layer for the image was stamped with a fish (not sure which set this came from *blushes*) and then the image itself, which was a digital image from Just-Inklined called Man at work. The image was coloured in using Promarkers.
The card was finished off with a greeting printed off on the computer, and a "Good Luck" peeloff.
Saturday, 17 September 2011
Snowy winter scene

Mum and I first saw this stamp at a promarker class we went to at In2Crafting at Wickford
In2Crafting run an online shop as well, but I would definitely recommend a visit to the shop as René and John who run it are super helpful.
Anyway, this image has been coloured using a combination of promarkers and spectrum noir pens. The glittery "snow" effect was achieved using a quickie glue pen and my trusty favourite - Glamour Dust!
Thursday, 8 September 2011
Winnie Polkadoodle owl

First, I coloured the background of the card, so I was positioning my image in correct colours, then I coloured in and layered the images I printed off with promarkers. I glued the fence so it curved slightly, which I think gave a good effect.
I do like the muted tones here, but stupidly didn't write down the colours.
I was pleased with the results though - not quite up to Nikki's standards, but quite passable for me!
Thursday, 25 August 2011
DL - landscape card
A friend of a friend is being honoured with the freedom of the City of London. My friend wanted a congratulations card that somehow incoporated the logo and the Freedom ceremony.

I cut two strips that were 4inches by 8 inches and one strip that was 4 inches by 10 inches. I scored the last strip in each side at the 1 inch mark so that I could then glue the two side strips onto it.

 Inside the card, I stuck an insert with a saying on it. All three folded in to make a card that fitted a DL envelope perfectlhy!

I cut two strips that were 4inches by 8 inches and one strip that was 4 inches by 10 inches. I scored the last strip in each side at the 1 inch mark so that I could then glue the two side strips onto it.
This made a DL card, but opening landscape. I embossed the front with the swirls embossing folder, and covered the join with spotty ribbon. I embossed the greeting with the Cuttlebug onto the same white card and sprayed it with Crafters Companion spray and sparkle in silver. This was stuck onto the front of the card using foam tape, over the ribbon.On the right hand side of the card front I used an EK Success punch along the edge, and stuck a black ribbon tab on the centre, with a brad.

On the inside left cover, I used a downloaded copy of the logo cut out with a nestie label die to cover the join in the ribbon. On the right hand side flap, I used promarkers to make a backing layer, and stuck onto that the Freeman's oath.
 Inside the card, I stuck an insert with a saying on it. All three folded in to make a card that fitted a DL envelope perfectlhy!
Thursday, 18 August 2011
CD Sunday Challenge - Ovals

The bow is made from organza ribbon, and was tied round the poppy paper before the topper was put onto the DL card.
I am entering this card into the CD Sundays Challenge - Only Ovals.
Friday, 5 August 2011
Birthday beefcake...

Techniques used are a combination of printing images snagged from online, a digistamp from Mo Manning that was coloured in using promarker skin tones, and embossing using the Creative Expressions brickwall embossing folder in my 'bug.
The base card was white, and I printed onto cardstock the England badge background. This was then trimmed and put into the embossing folder. The brick edges were then highlighted using Cool Grey 1 promarker.
The brick embossed sheet was trimmed and the edges rounded off and then mounted on red mirri card.
More red mirri card was used to mount the happy birthday sentiment.
My strong man was shaped and then attached to the front of the "wall" using pinflair glue. Finishing touches were the two flags that represented the family heritage.
Monday, 1 August 2011
In the garden
I am entering this card into Sentimental Sundays - Challenge 66 and Polkadoodles week 30 challenge - in an english country garden
This card is a double twisted easel, incorporating stamping, colouring with promarkers and spectrum noir pens, die cuts and marbled paper. It fits into a standard DL envelope.

The base card was plain white cardstock, measuring 8 inches square, and scored in half. I used marbled paper (marbled using the My craft studio marbling inks) for the base of the card. The base was decorated with two swirls (cuttlebug die) and the stopper was white card with the edges distressed in shabby shutters, and matted with the same paper I used for the toppers. A sentiment from hero arts was stamped on the centre of it, and the two corners were a clarity stamp.

Each of the easels were 4 inches square, with the corners rounded. I distressed the edges using shabby shutters distress ink. I then used a nestie to provide a shaped layer in complementary paper, and matted the two toppers onto that.
The first topper (on the left) was one of the free downloads from the Sentimental Sunday website, with the edges distressed using shabby shutters, and the flowers coloured using a mixture of promarkers and spectrum noir pens.
 The second topper (on the right) was a sarah jane clear stamp. I coloured the image in using a combination of promarkers and spectrum noir pens, and again distressed the edges using shabby shutters. The small butterfly was from my stash.
I didn't put a specific sentiment on there - it can be a birthday, a get well, or just a thinking of you card that way.
Christmas Robin
I know, we are finally getting some warm weather! But I had a fancy to play with some of my Sheena Douglas stamps and have a go at a card with no layers. Scary! I did have a plan, though. If any of the colouring or stamping had gone majorly wrong, I would have layered another version over the top!
 In the event, though, it all went well.
I did the stamping first, using a memento black ink pad - this was because I wanted to use my promarkers. The sentiment was stamped in the bottom right hand corner. On reflection, I think I could have got that a bit more straight, but it wasn't bad enough to have to cover it up!
The foliage stamp was used to create the effect of a tree. It should perhaps have come further out - the bit the bird is sitting on looks a bit sad, but I didn't want to take anything away from the main image of the robin.
 The background was shaded using a combination of faded jeans distress ink, and one of the big and juicy pads. To get the moon, I used a mask made from a circle punched from a post it note . I used the inkylicious blending dusters to get the light effect - I find I am a bit too heavy handed with the cut and dry foam...
 I was pleased with the way the robin turned out. My blending can be a bit hit and miss, to be honest. I need to practice more! My mum loves colouring and has it down to a fine art but I am more of a novice.
To finish it off, I stamped a greeting across the moon and then sprayed the whole thing with some silver spray and sparkle from crafters companion.

I did the stamping first, using a memento black ink pad - this was because I wanted to use my promarkers. The sentiment was stamped in the bottom right hand corner. On reflection, I think I could have got that a bit more straight, but it wasn't bad enough to have to cover it up!
The foliage stamp was used to create the effect of a tree. It should perhaps have come further out - the bit the bird is sitting on looks a bit sad, but I didn't want to take anything away from the main image of the robin.


To finish it off, I stamped a greeting across the moon and then sprayed the whole thing with some silver spray and sparkle from crafters companion.
Subscribe to:
Comments (Atom)