Xmas 2015

Copyright

I hope you enjoy reading this blog and find inspiration and ideas from what you have seen here but I would ask you to please respect my copyright and not use my pictures for publishing as your own work, or for entry into challenges.

Tuesday, 19 April 2011

Paper Roses

I have really got into making paper roses and other flowers lately. The only problem is that they can stand proud of a card, and I thought I would try to see if I could protect them a bit. These cards are different occasions - one a wedding and one a leaving card, but I used the same format. Both are A5 in size with an aperture bow front.
This was the leaving card, utilising brown and cream as the colourscheme. My trademark butterfly was diecut in cream and left plain.  The outside edge of the aperture was embossed using an embossing folder.

This is a close up of the flowers on the outside of the bow front. The rose on the inside is larger, and acetate protects it by being stuck inside the aperture.  The centre of the flowers were small amber coloured gems.


This card was for a wedding. The colour scheme was cream and gold. It is the same style as the leaving card, but I did include some additional embossing on the front, using cuttlebug embossing folders for the sentiment.  My butterfly was diecut from gold card.


Not all of the flowers for this one were hand made - the gold net flowers were bought from Hobbycraft.


The heart was embossed using the EaziScore board, and then outlined with border peeloff stickers.  The couple's initials were put in the centre of the two smaller hearts.

Friday, 8 April 2011

Birthday easel card


This was a birthday card ordered by a friend. She asked for pink and glitzy - and of course, I had to include my butterfly! Also included was a swirl stamp, with gems stuck on at appropriate points, and the sentiment was mounted on pink glitter cardstock. The background papers came from a My Craft Studio cd (Papercraft, I believe).

Wednesday, 6 April 2011

Exploding box

I was also asked to make an "exploding box" for a colleague's daughter when she was 18. I was again given a colour scheme of pink, white and black.

The pink panels were embossed with the cuttlebug swirls embossing folder, and all were edged with fine border peel offs. My latest passion for making paper roses and other flowers was indulged in and I was really pleased with the way the white pearlescent paper looked.


Because it was an 18th birthday, I thought it would be cool to include a key somewhere in there.


The "hinges" of the box were vellum, stamped with butterflies (that theme again!) and the inside of the box was decorated with photos of the birthday girl, supplied by my colleague. I understand that the present was to be placed inside this box (it was a locket).

18th birthday card

The theme - pink, black and white.

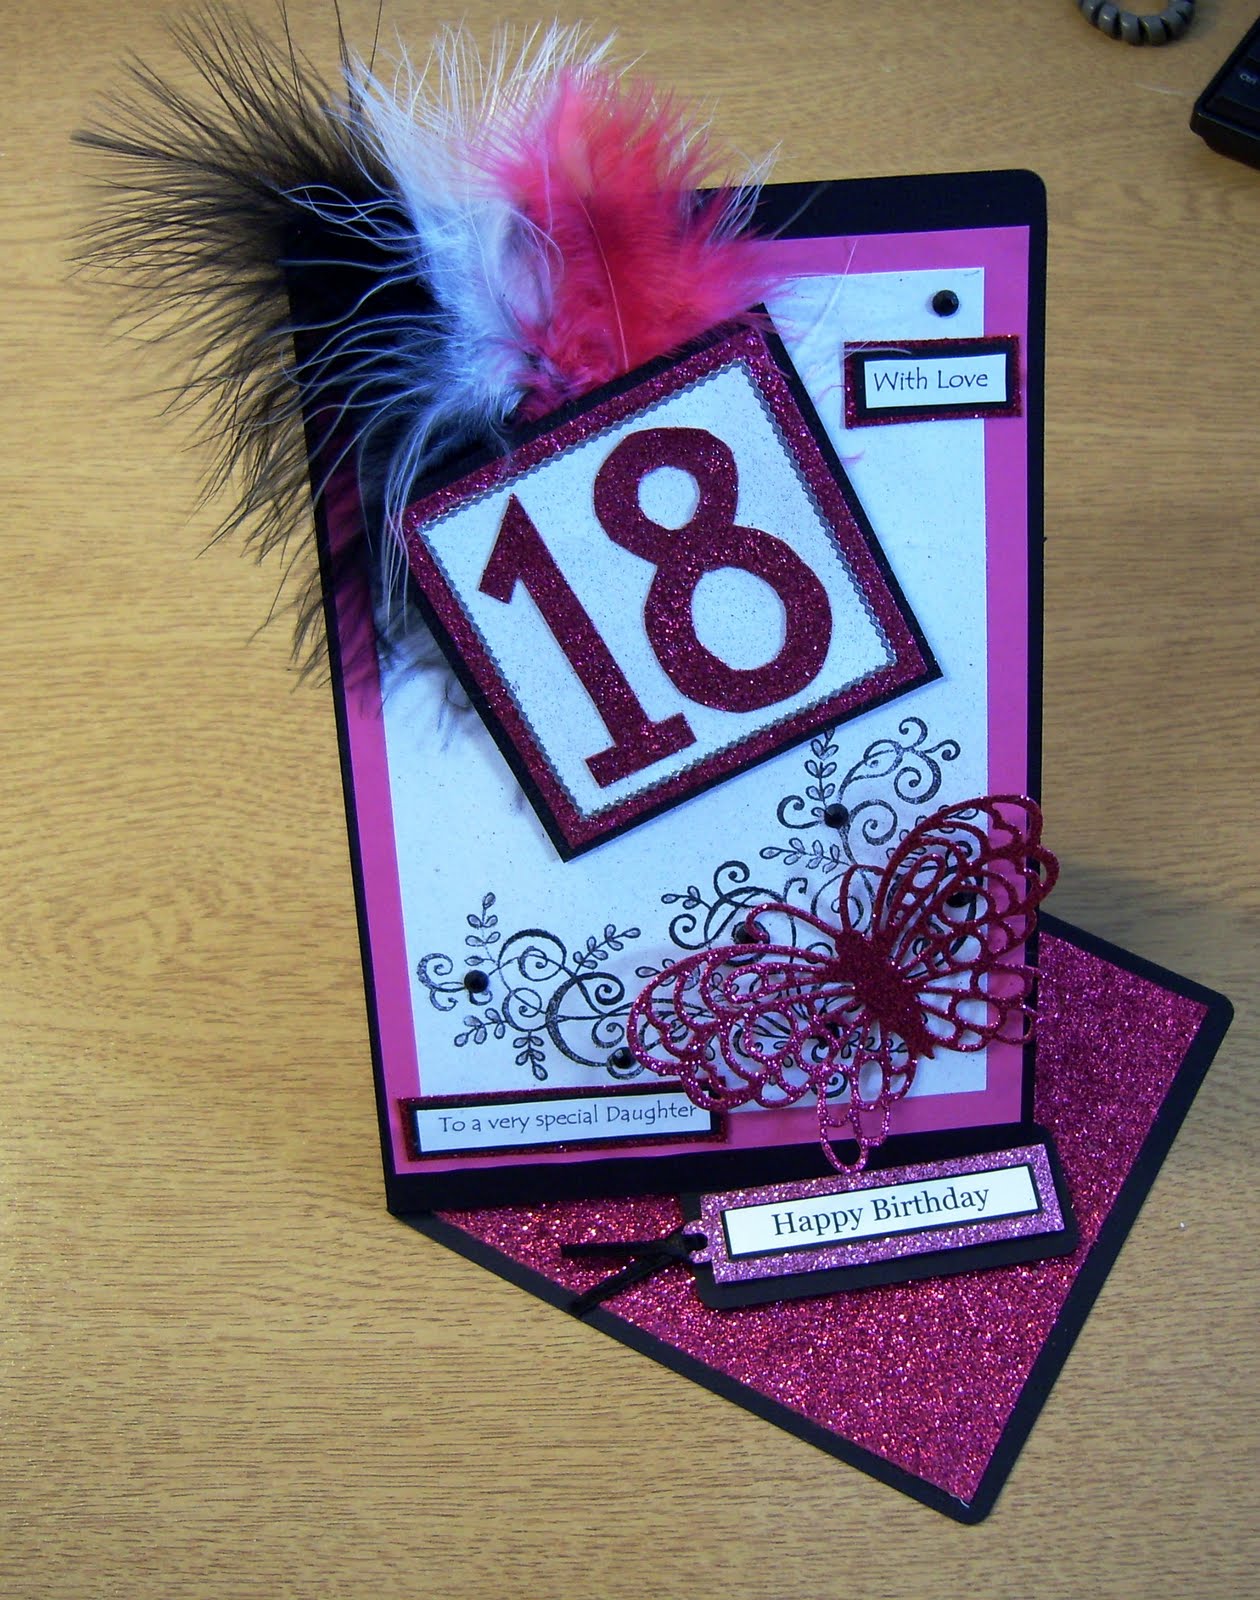
 This card was for a colleague to give to her daughter and she was very specific about the colour scheme.  I'm not into pink, especially the vibrant pink that she chose, but I was pleased in the end with the finished card.
The card was an A5 twisted easel card, I used a pink, black and white feather to put behind the "18" topper.  The 18 was cut from the pink glitter card used for the base.  I layered fuscia pink and black card and added white card that had been sprayed with the Crafters Companion silver spray and sparkle.  A swirl was stamped in the corner of the front of the card and a diecut Marianne Butterfly was used to give dimension.  I stuck gems coloured pink with promarkers onto the stamped swirl.
The greeting tag at the bottom was stamped on white card, then layered onto the pink glitter card and black card and applied using foam tape.

Saturday, 1 January 2011

And it came to pass...

I have other blogs, which I use to talk about life in general, but I wanted one to share my hobby of crafting specifically. So here we go! Isn't it pretty??

I've always enjoyed making things, and from a very young age have had a passion for pens. Very unusually for a child I began collecting fountain pens because I wanted them, not because I had to have them for school. And there is something about a shop filled with paper that I find almost irresistable...

So it was logical that my first crafting efforts would be calligraphy. I still like the art of pen and ink- but now it is only but one of the weapons in my armoury. In my crafting career, I have knitted, sewed (clothing, patchwork and cross stitch), crocheted, painted, made rugs, stencilled, decoupaged, made pottery, rubber stamped... and the list goes on. My main passion is for papercrafting.

I really wish I could pick just one craft and specialise - but I don't. Just like the butterflies I love, I flitter from one thing to another. And because of my pack rat nature, I collect and hoard all the necessary tools and equipment. There are a lot of crafting supplies in my house...

My plans for this blog are to post pictures of each card or project I make, along with a brief summary of what I used and how I did it. I will be posting historical pictures too - so I will probably have no clue where I got that paper from, or that stamp. But you have to begin somewhere, and it is interesting to see how my style developed since I got the crafting bug many years ago! Each post is dated when the picture was taken, so earlier projects will be before this entry.

Sunday, 24 October 2010

Christmas fancy


This card was one that we did in November last year at our class. I like cards that have dual purpose - and this one was an easel card with a cunning little box on the front to put recipe cards inside. As it was for Christmas, the recipes were for mincemeat, orange pastry, and mince pies. The picture of the art nouveau lady with the tree was from a Debbie Moore cd.

Thursday, 17 March 2005

Butterfly


Another card featuring a butterfly - the same stamp! This one also incorporates some dry embossing from one of the Glitter Girls boards and some peel offs. I particularly like the simplicity of this one.

Monday, 28 February 2005

Birthday card


This was a simple card, made using rubber stamped butterflies coloured with felt tip pens, and a background produced using blow markers with a butterfly mask. I first bought some of these years ago, but when I wanted refills, had to order them from America. They are felt tip markers with a tube cap, that works like a manual air brush - you blow into the cap, and the air blowing across the felt tip of the pen releases the ink.

The greeting was a peeloff.