Xmas 2015

Copyright

I hope you enjoy reading this blog and find inspiration and ideas from what you have seen here but I would ask you to please respect my copyright and not use my pictures for publishing as your own work, or for entry into challenges.

Thursday, 30 August 2012

Another wedding card

Wedding Card
I mentioned before that one of my former trainees is getting married this weekend and I posted a card I had made for my friend C to give to him.  This is the card I am sending myself.

I used pearlescent white card to make a 7 x 5 inch base, and then embossed a panel using my Creative Expressions Flourish embossing folder in the same cardstock.

From some silver card, I cut out a horseshoe shape, and embossed the "nail marks" using a ball tool from the back.  To provide some definition to the edge, I used some flexible silver peel off strips and finally  I stuck some organza ribbon to each end of the horseshoe, to make a loop.

Bride and Groom
The characters came from a Forever friends stamp set, and were coloured in using promarkers.  I used the clear #700 gelly roll pen to make the veil sparkle.

Sentiment on Fancy Tag
Using the same white pearlescent cardstock and the Spellbinders Fancy Tags Two set, I cut a tag to use for my sentiment.  I attached this to the top of the card using foam pads and then attached the horseshoe to hang over the top of it using a decorative crystal brad.

I am entering this card into the following challenges:

Divas by Design - Challenge 50 Lets Celebrate
I love Promarkers - Anything Goes

Monday, 27 August 2012

A King for the day...


 I had an unusual project to make this weekend - my friend S asked for a gift box in the shape of a crown. 

This was for one of her friends who always jokingly says "if I were King for a day I would......(whatever it was)".

To begin with I was stumped as to what to do - the box needed shape, but also needed to hold the small gift.

Eventually, I came up with a hexagonal box, and I used my nestabilities to make the decorative elements (Ironwork Accents and Parisian Motifs).

I began with some textured gold cardstock, and cut out the hexagonal shape for the lid and the base.  I then added the sides, edged with a narrow peeloff to add definition and  joined together with a paper pocket hinge. 

This enables the box to be opened out fully when the lid is removed.

I used the smaller dies in the set to make the embellishments to go in the centre of the sides and used gems from my stash.

The inside of the box was lined with some decorative paper and a clarity stamp sentiment.

I then began to embellish the "crown" lid.


First I used some thin decorative braid to put around the base of the  lid. 

I used the waste from the ironworks border to make the part that went across the top and stuck the ironworks border around the top

On the top of the lid, I used a smaller hexagon, run through the bug with a lattice embossing folder.  This was stuck in place with a foam pad.

The final touch was the cross embellishment on the centre front of the box lid.

I made another box for the gift box to be given in - but this one was just plain card!!

I am entering my gift box into the following challenge:

Allsorts Week 169 - It's a gift


Wedding Bells

How time flies! One of my former trainees at work is getting married shortly and it seems no time since he was that harem scarem 18 year old...

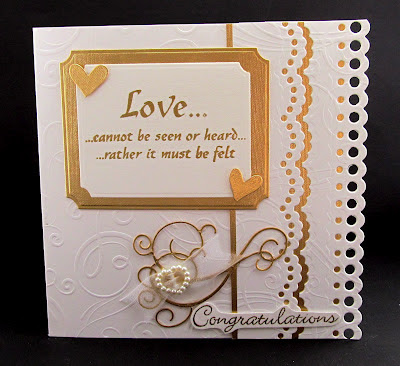
Anyway, my friend C is going to the wedding and has asked for a card that will double up as a gift card holder.

For the base card, I used some cream hunkydory swirl card, which I cut down as if it were going to be a 15 cm square card.  I then folded it so that there was a flap on the left hand side, and the right flap was folded so it butted up to it.  (folds at 10 and 25 cm).


Then, using a 15cm length of the piece I cut off when I made the base card, I cut first one border (with the holes) and then the second (lace) from it.

I used a piece of textured gold card to make a base for the border strips, and stuck the lacy border slightly apart from the other piece of the card so that the gold showed through. The whole thing was then stuck to the base card, so that it overlapped the second fold.

Using the same gold card, I cut out the swirl (Memory Box Elegant Scrollwork), the heart borders (Memory Box twirled heart border) and a mat from nestie large labels.

I stamped the sentiment onto plain cream card, and then cut it out with the slightly smaller large label and matted that onto the gold mat.

I used two hearts from the offcuts of the heart border to decorate the sentiment panel.   

I put some organza ribbon through a pearl heart buckle I had in my stash and used that a an embellishment on the swirl.

Finally, I stamped congratulations on the same cream card and cut round it so it would fit onto the bottom corner.

Inside the card, I decorated the inner flaps with the twisted card diecut, and used the last of the embossed cream card to make a "giftcard" pocket.

I will print out an insert to go inside to finish it off.


I am entering this card into the Joanna Sheen Totally Sentimental Challenge

Saturday, 25 August 2012

First Christmas card of the year...

It's leading up to a typical English Bank holiday today - in other words, it's raining.

I was going to do the garden, but that got washed out.  Then I thought I should do housework, but my craft room was calling to me instead. Today, I thought I would go through my stash and make a card with what was already available without too much effort.

And what was available was the remnants of a Kanban christmas kit, some toppers that I printed off  last year from the Create and Craft Triple treasures cds I bought some time ago, and some snowflakes that were the bits left over from a memory box border die.

I used the card blank from the Kanban kit and stuck the snowflakes down the panel with pinflair gel.  In the inside, I distressed an embossed piece of card from the Kanban kit with tumbled glass distress ink around the edges and mounted it onto some blue shiny card to leave a very thin border.  I then ran the topper though the 'Bug using the biggest of the large labels die and mounted that in the centre of the panel using pinflair glue. Lastly, the Merry Christmas sentiment also came from the Kanban kit, but I used the tumbled glass distress inks to take the stark "whiteness" off of it.

One card done - many more to go... Especially since this is the first year that my mum won't be helping me make them.  I suspect it is going to take me a long while to do them all... :(

I was going to enter this card into the CD Sunday challenge this week - Cute Christmas but like a twit I didn't realise that the deadline was 1pm on Saturday..  *sigh*  let that be a lesson to everyone - when you enter a challenge, READ THE RULES!!!!

Thursday, 23 August 2012

Crafty Cardmakers Design Team Call

Crafty Cardmakers are still having a DT call and if you think you could create up to two projects per month (although there is no pressure to come up with something for every challenge as we are a VERY laid back team), and comment on a percentage of the entries per challenge then why not apply?

All you have to do is go over to the Crafty Cardmakers blog and enter our latest challenge, and add DT after your name in the linky box.    Lin is holding this open until we have enough new members to boost the team, so at this present time there is no closing date for the call. 

Please read the challenge criteria carefully as we had a few DT applicants last time around who had not really understood that we wanted a sport themed creation and they entered something that didn’t have such a theme to it. 

If you would like to apply for the team, but do not wish to enter our current challenge, then please drop Lin a line at ccmchallenges@gmail.com with a link to 3 of your favourite posts.

Go on.... have a go.  What have you got to lose?
 

Monday, 20 August 2012

Crafty Cardmakers Challenge 73 I do like to be beside the seaside...

This weeks challenge at Crafty Cardmakers is hosted by Yvonne.  
She says:

I would like a post card [6x4inches approx], showing a beach scene, and would like it to include some beach and the sea, for the background to the focal image. 
 ***
I knew that this week was going to be out of my comfort zone because I don't usually do scenes - this was something my mum loved to do - but also I don't have any beach stamps.  So, because I also love the fact that in crafting you can mix and match skills, techniques and styles, I decided to use a photograph for the base. 
I printed the photograph out onto matte card, and then using walnut distress ink, stamped out the boats (from the Sheena Douglass on the water range) in the foreground onto the beach.  I used a small amount of water and a fine brush to colour the images.  I then took some essential grasses stamps from Inkylicious and stamped them in the foreground.

Finally, I stamped the sentiment (also from Sheena Douglass) in the sky.  
We are being sponsored this week by
$10 Gift Certificate for the Store
Digi Doodle Shop is the results of a mother and daughter’s love for the arts and crafts. It was started a little over 3 years ago with a little more than 100 stamps, and has since then grown to almost 500 stamps. Joy (the mother of this team) designs realistic images, while Judy (aka/daughter) loves the “fun side of life”, and create images with a cartoon flair. Having these two complimenting styles have enabledDigi Doodle Shop to offer a wide variety of stamps.

It is a real honor and pleasure to sponsor this challenge, and we look forward to seeing all the amazing creations. We thank the design team for their incredible creations, and wish all the participants the very best of luck in this challenge.

Thank you so much for having us, and again the very best of luck to all of you.

Sincerely,
Judy and Joy
and also


We are sponsored today by ONE STOP CARD CRAFTS who are offering a £10 voucher for their store as a prize.
At One Stop Card Crafts we have a big range of ever changing discount making and card making craft supplies.
We are always adding to our range of craft supplies which are ideal for making handmade greeting cards, do-it-yourself invitations scrapbook pages, altered items and much more.
Our card making craft supplies include free UK postage, our popular discount scheme and quick service means our customers keep coming back for more.
Our prices are very competitive and this & makes us an ideal place to buy your card making supplies online. Some of our new products include Petaloo flower layers, Ranger Glitter Glue and Martha Stewart Punches. We also host a regular challenge at http://onestopcraftchallenge.blogspot.com/

Friday, 10 August 2012

A fishing birthday...

 An online friend asked all her online friends to send surprise birthday cards for her partner and this is the card I came up with.  It's a basic stepper card.

Flitterglu'd fish
My mum was always the promarker queen, and since she died I haven't really touched them.  So I thought this was a good time to cross that bridge, and had a go with this stamp set from Personal Impressions.  I stamped the fisherman first, then masked him and did the background using an assortment of stamp pads - Big and Juicy Waterfall, Adirondack sunset orange and lettuce.

I then coloured him in (not as good as my mum used to do, but I'm rusty...).  I stamped the word Fishing from the stamp set at the bottom, and then cut it out using a nestie shape which I mounted onto plain black card.

On a separate piece of card I stamped the fisherman's sentiment " A bad day of fishing is better than a good day of work" and mounted it onto the same black card I used for the nestie shape.

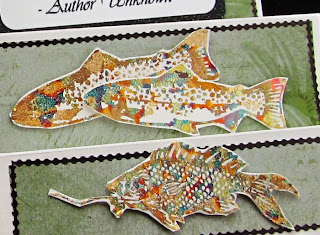
I used some pretty green paper from my stash to cover the "steps" and then the fish were stamped using flitterglu and covered with the gilding flakes, because I thought the scales would be particularly effective.  I cut them out and stuck them to the front steps using pinflair gel.

The three steps were all edged with silver peel off border strips that I coloured black with my promarker.

Finally, I used a Little Claire Designs save the date stamp for the birthday greeting.

Monday, 6 August 2012

Crafty Cardmakers Challenge 72 Olympic Spirit

The challenge today is set by Feebsy, and in honour of the Olympics she'd like to see some sport inspired creations.  Any sport will do but it would be brilliant if there were some sports that are competed at the Olympic (including the Winter Olympic) Games.

Our generous sponsors for this challenge are

who are offering one lucky person a $10 Gift Voucher

and Hobby Art

the prize this time from Hobby Arts are these two lovely stamp sets...
 
As a family business we're a friendly, helpful, bunch at Hobby Art.  All our stamps are designed by us and manufactured in Britain. 
Look at the gallery on my blog - jennymayes.com - for lots of card ideas using the Hobby Art range.
We're pleased to sponsor the Crafty Cardmakers Challenge and look forward to seeing the entries.  Good luck everyone. 

Jenny and all. X 

I struggled a bit with this challenge  - who knew I had so little sporty material in my crafty stash???  Then I remembered that I had some 12 x 12 sheets from docrafts which were Best of British and took inspiration from them.   The topper was on a sheet with a  number of others, so I carefully cut round it. The base card was plain white, and I distressed the corners with Faded Jeans distress ink.  There was also a cutout of the union jack in a shape in the pack, so I used that as my background.  The bunting stamp was from a freebie set I got some time ago with a magazine, and I coloured it with some watercolour pencils so that the effect was more muted. I wanted to recognise the Olympic year, so I used a Little Claire button sentiment stamp, and instead of the age put the year.

Lastly, don't forget - Crafty Cardmakers will be holding a Design Team call.  Keep an eye out for Lin's post on the Crafty Cardmakers blog, which will tell you what to do!